loader

Activity No. 5: Measuring Soil Moisture (Vittascience Starter Kit)

Using the soil moisture sensor with the NUCLEO-L476 board.

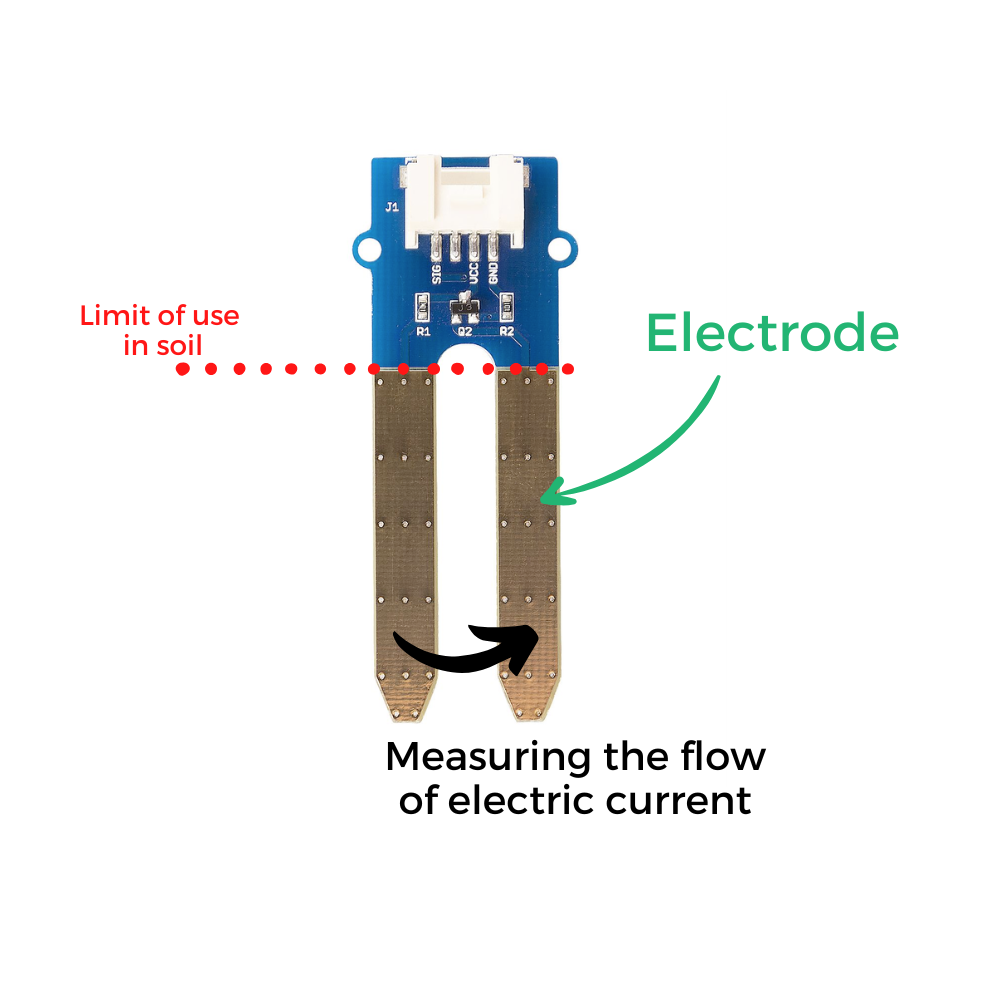
The Grove soil moisture sensor is a module that measures the water content of the soil.

The operating principle is simple. The metallized fork (which are two electrodes) must be planted in the ground.
The voltage between the two electrodes is measured. 

zoom-humidite

The wetter the soil, the easier the current flows. Conversely, when the ground is dry, the current flows with difficulty. 

The information returned by the sensor is a value between 0 and 4095. In theory, 0 corresponds to dry ground and 4095 to the value returned by the sensor if it is immersed in water.
In practice, the sensor must be calibrated (see Converting the humidity value into a percentage).

Please note: only the golden ends should be pushed into the ground. 

To measure the moisture content of the soil using the NUCLEO-L476RG board, the following connection must be made: 
- Connect the Shield Grove to the connectors on the board. 
- Connect, using the Grove cable, the screen to one of the ports named I2C available.
- Connect the soil moisture sensor using the Grove cable to one of the analog ports. We will choose port A0.

humidite-EN

Be careful to respect the direction of connection of the Grove cable (4 wires in 1 with polarized slot).

Let's get to the programming now! 

We will use two blocks:
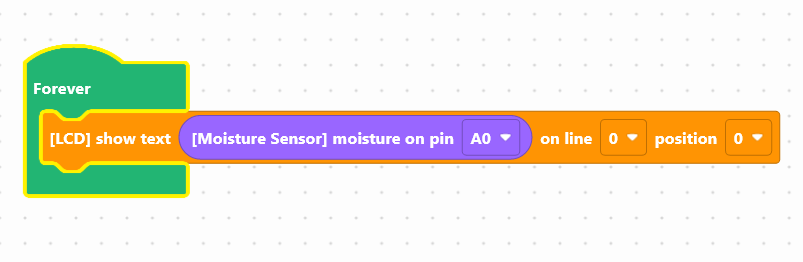
- " [LCD] display text ... on line 0 position 0 ", available in the Display of the block locker to manage the screen.
- "[Moisture sensor] soil humidity on pin A0", available in the Sensors, to retrieve the value of the module.
moisture-en-1

Use the following interface to program the module: 


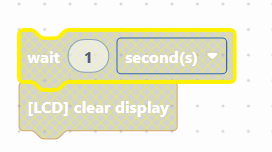
To facilitate reading, you can insert a pause and clear the screen. 
clear-one


Once the program has been created, it must be copied onto the card. To do this, you must use the "Upload" button (see Activity 0:  Getting started with the board).

In order to display the measured soil humidity value as a percentage, you must first perform a sensor calibration. 
That is to say, define the measurement range of the sensor (i.e. the lowest and highest value) that can be had. 

Calibration: 
Two manipulations must be carried out: 
  1. Measure the value returned by the sensor in the air and write it down on a sheet. The air is considered to be the driest soil that can be encountered. 
  2. Measure the value returned by the sensor, immersed two-thirds in a glass of water and write it down on a sheet. Water is considered to be the wettest soil you can have.


The two values ​​noted on the sheet will be integrated into the following block: " transform the value (soil humidity) from [ (value of the sensor in the air) to (value of the sensor in the water) ] to [0 to 100].

humidite-en


Here is an example of ready-to-use code:


This code includes:
- the creation of a humidity variable to which we assign the value returned by the humidity sensor
- the display of a text consisting of the rounding of the transformation in percentage + the acronym % 
- a 1-second pause
- the cleaning of the screen to facilitate reading

Launch the simulator to check the good execution of your program or download it on the card. 


You succeeded? Perfect, you now know how to program a soil humidity sensor using your NUCLEO-L476RG board! 
Discover the other activities of the Starter kit by clicking on the icons below.

User licence